
The real challenge of a Chic-Chocs winter ascent isn’t the climb; it’s winning the invisible physiological war against extreme cold and altitude before you even leave home.
- Your body burns calories at an astonishing rate to stay warm, requiring a strategic, non-freezing nutrition plan.
- The unique maritime humidity makes moisture management a critical survival skill, not just a comfort preference.
- Success depends on practicing safety protocols—from avalanche rescue to whiteout navigation—until they are second nature, reducing deadly cognitive load under stress.
Recommendation: Shift your training focus from simply building endurance to mastering metabolic management and moisture discipline. These are the skills that truly keep you safe and successful in Quebec’s demanding winter environment.
The stark, windswept beauty of Quebec’s Chic-Chocs mountains in winter is a powerful lure for any mountaineer. The promise of untouched powder and vast, frozen landscapes is intoxicating. For the summer hiker, perhaps from a milder, sea-level climate like Ireland, this transition represents a significant and thrilling new challenge. Many believe that preparing for this means simply adding more layers, buying stiffer boots, and pushing harder on the treadmill. They approach it as a simple escalation of a summer hike, a matter of brute force and warmer gear.
But this is the first, and potentially most dangerous, mistake. The Chic-Chocs in winter are not just a colder version of a summer peak. They are a different beast entirely, governed by the harsh laws of a maritime-arctic environment. The usual advice—”stay warm,” “pack snacks,” “be fit”—is dangerously inadequate. It fails to address the core of the challenge. The real battle isn’t fought against the mountain itself, but within your own body. It is a physiological war waged on multiple fronts: against relentless calorie drain, invasive moisture, the suffocating effects of altitude, and the crushing pressure of time.
But what if the key to a successful ascent wasn’t found in more raw power, but in a smarter strategy? What if you could train your body to be a more efficient furnace, a better-regulated system, and a more reliable tool? This guide is built on that premise. We will dissect the specific environmental stressors of the Chic-Chocs and provide a tactical training plan. We will move beyond generic advice to explore the critical science of calorie expenditure, moisture discipline, avalanche preparedness, acclimatization, and navigation under pressure. This is your strategic briefing for winning the physiological war, ensuring your expedition is not just about survival, but about a triumphant summit.
This article will provide a complete framework for your preparation, covering the essential physical and technical skills required. To help you navigate this comprehensive guide, the summary below outlines the key pillars of your training strategy.
Summary: How to Prepare for a Winter Expedition in the Chic-Chocs
- Why Do You Burn 40% More Calories in Cold High-Altitude Environments?
- The “Cotton Kills” Rule: Why Is Moisture Management Critical at Summit Temps?
- Beacon, Shovel, Probe: Which Brand Offers the Best Reliability for Novices?
- The Turn-Around Time Mistake That Leads to Night Rescues
- Sea Level to Summit: How Fast Is Too Fast for Your Body to Adapt?
- Why Is the “Gasp Reflex” the Real Killer in Cold Water Kayaking?
- 10 lbs or 30 lbs: How Heavy Should Your Ruck Be to Avoid Back Injury?
- How to Navigate Above the Treeline When Visibility Drops to Zero?
Why Do You Burn 40% More Calories in Cold High-Altitude Environments?
In the frigid air of a Chic-Chocs winter, your body isn’t just working to carry you uphill; it’s fighting a desperate battle to maintain its core temperature. This is the first front of your physiological war. Every shiver, every breath of icy air you warm, and every step through deep snow expends energy. This isn’t a linear increase. Research from ACE Fitness shows that high-altitude trekking with a pack can result in a massive caloric demand, with an activity factor of 1.725 for trekking with a 10-15 pound pack, and that’s before factoring in extreme cold. A day in the Chic-Chocs can demand over 5,000 calories just to break even.
Failing to fuel this internal furnace leads directly to hypothermia, poor decision-making, and physical failure. Your nutrition strategy must be as meticulously planned as your route. The primary challenge isn’t just packing enough calories; it’s packing them in a form that’s accessible when everything around you is frozen solid. Water-based foods like sandwiches will turn into inedible bricks. Hydration bladder hoses will freeze in minutes, cutting off your most critical resource. This is where metabolic management becomes a technical skill.

As the image above demonstrates, even high-energy foods are vulnerable to the cold. The key is a multi-pronged strategy: prioritize high-fat foods like nuts and chocolate which have lower freezing points. Keep pliable foods like energy bars in an inner jacket pocket, using your body heat to keep them chewable. And most importantly, use a wide-mouthed, vacuum-insulated thermos for hot, sugary liquids—it provides instant calories, warmth, and critical hydration in one go. Pre-cutting and portioning everything at home minimizes time with bare hands exposed to the wind, a small detail that makes a huge difference in preserving energy and dexterity.
The “Cotton Kills” Rule: Why Is Moisture Management Critical at Summit Temps?
Every mountaineer has heard the old adage, “cotton kills.” But in the Chic-Chocs, this isn’t just a rule; it’s a law enforced by the unique physics of its maritime snowpack. Unlike the dry, continental cold of the Rockies, the air here carries significant moisture from the nearby St. Lawrence Gulf. This humidity makes everything feel colder and, more dangerously, it means your own sweat is a far greater threat. Water conducts heat away from your body 25 times faster than air. Once your base layers are wet, you are actively refrigerating yourself from the inside out.
This is where moisture discipline becomes the second pillar of your physiological battle plan. The goal is not to avoid sweating—an impossible task on a steep ascent—but to manage it actively. This means starting your hike feeling slightly cold, wearing only a thin merino wool or synthetic base layer. You will warm up within minutes. The moment you stop for a break, you must immediately add an insulation layer to trap the heat you’ve generated. Before a steep, high-exertion push, you might even strip back down to your base layer, anticipating the heat spike. This constant adjustment is what we call the “Puffy Dance.” It is a proactive, continuous process of regulating your microclimate.
Mastering this requires practice. Your layering system—base, active insulation, wind shell, and a heavy “puffy” jacket for static periods—must work in concert. You must be able to add or remove layers in under a minute, often without taking off your pack or even your mitts. This is a skill you should practice at home until it is fluid and thoughtless. In the Chic-Chocs, a five-minute stop to fumble with zippers is five minutes of losing precious body heat to the wind.
Your Action Plan: The ‘Puffy Dance’ Layering Technique
- Start ascent with minimal base layer to prevent initial overheating.
- Add a mid-layer at your first rest stop before heavy exertion begins.
- Remove the mid-layer just before the final, steep push to the treeline to manage sweat.
- Immediately don your warmest insulation layer (puffy jacket) upon reaching any wind-exposed plateau or during any stop longer than two minutes.
- Practice 30-second layer changes without removing your pack or mitts until it becomes muscle memory.
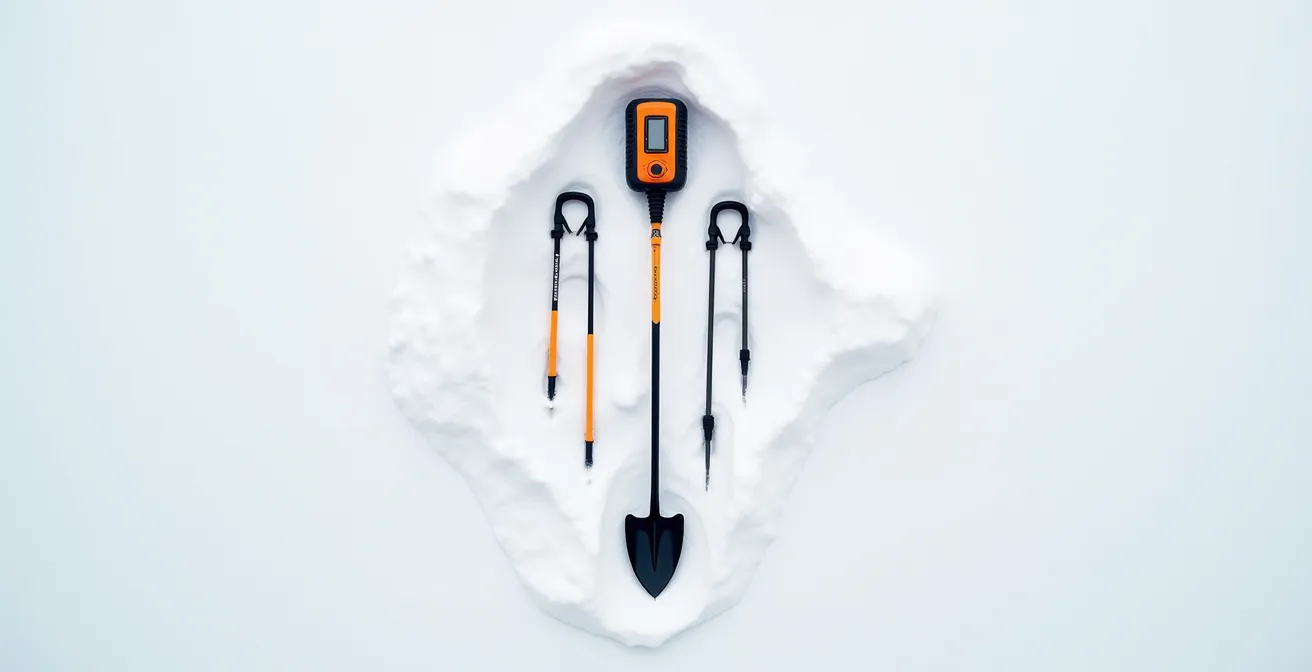
Beacon, Shovel, Probe: Which Brand Offers the Best Reliability for Novices?
Entering the backcountry of the Chic-Chocs in winter means you are entering avalanche terrain. There is no way around it. Your beacon, shovel, and probe are not optional accessories; they are your ticket to giving a buried partner a chance at survival, or them giving you one. When it comes to choosing this gear, especially for a novice, the question isn’t about the “best” brand in a vacuum. It’s about which tool is most reliable and intuitive under the immense cognitive load of a real emergency.
When a slide happens, your heart rate spikes, your hands are numb, and your brain is flooded with adrenaline. A complicated beacon with multiple modes and confusing menus is a liability. For a novice, the key features are: a simple, clear display, a fast processor to reduce lag, and controls that are easily operated with thick gloves. Some modern beacons, like the Ortovox Diract Voice, even offer voice guidance, which can be a calming, focusing influence in a high-stress scenario. Models like the Mammut Barryvox or BCA Tracker 4 are famous for their straightforward interfaces. The “best” beacon is the one you have practiced with relentlessly.
But the gear is only 10% of the solution. The other 90% is training. Owning the gear without knowing how to use it instills a false, and fatal, sense of security. As critical research from avalanche safety experts reveals, the difference between a live recovery and a body recovery is measured in minutes. A practiced team can often locate and excavate a victim in under 7 minutes; an unpracticed group can take upwards of 25 minutes, by which point the chances of survival are tragically low. Before you even think about booking a flight, book an accredited AST 1 (Avalanche Skills Training) course. It is the most important investment you will ever make.
The Turn-Around Time Mistake That Leads to Night Rescues
In the mountains, the summit is only the halfway point. This fact is easily forgotten in the grip of “summit fever,” the powerful psychological pull to push on just a little further. In the short days of a Quebec winter, this single mistake—ignoring your pre-determined turn-around time—is the number one reason teams get into trouble, transforming a beautiful day into a desperate, hypothermic night and a call for rescue.
Your turn-around time is not a suggestion; it is a hard, non-negotiable deadline you set for yourself before you even begin your ascent. It is calculated based on total daylight hours (as few as 8 in deep winter), your group’s pace, and a generous buffer for weather or unforeseen difficulties. A common rule is to allocate 50% of daylight for the ascent, which means your turn-around time is often solar noon or shortly after. Regardless of whether you are 100 meters or 1 kilometer from the summit, when that time comes, you turn back. No discussion. No exceptions. This discipline is a sign of an experienced mountaineer, not a weak one.
The local guides in Gaspésie have a beautifully simple and effective rule of thumb that encapsulates this principle, born from decades of experience watching the weather roll in off the water. As the official Parc national de la Gaspésie guidelines state:
If the sun is touching the horizon over the river, you should already be back below the treeline.
– Local Gaspésie Mountain Guide, Parc national de la Gaspésie Safety Guidelines
This isn’t just poetic; it’s a critical safety metric. By the time the sun appears that low, you have minutes of usable light left, and the temperature is about to plummet. Being caught above the treeline in the dark and the wind is a life-threatening situation. Your headlamp is a tool for starting early, not for finishing late. Respect the clock, respect the mountain, and you will earn the right to come back and climb another day.
Sea Level to Summit: How Fast Is Too Fast for Your Body to Adapt?
For a mountaineer arriving from a sea-level home like Dublin or coastal Canada, the altitude of the Chic-Chocs—with peaks like Mont Jacques-Cartier reaching 1,268m (4,160 ft)—presents an insidious challenge. While not “high altitude” by Himalayan standards, it’s more than enough to degrade performance and, in some cases, trigger Acute Mountain Sickness (AMS) if the ascent is too rapid. Your body, accustomed to oxygen-rich air, suddenly has to work harder for every breath. This is the fourth front of the physiological war: acclimatization.
Ignoring this can lead to headaches, nausea, dizziness, and extreme fatigue, symptoms that not only ruin your trip but can also lead to dangerous mistakes. The key is a gradual adaptation. Your trip itinerary should be designed as a deliberate acclimatization protocol, not a mad dash for the highest peak on day one. Fortunately, even a short period of adaptation yields significant benefits. A landmark study on performance, while conducted at higher elevations, demonstrates the principle: compared to sea level, cycle ergometer endurance time increased 61 percent after just 12 days of acclimatization. Even a 2-3 day build-up in the Chic-Chocs will make a world of difference to your performance and well-being.
A smart low-lander’s schedule would look something like this:
- Day 1: Arrive and settle in. Do an easy, low-commitment snowshoe hike to a lower elevation point like Lac aux Américains (around 800m). Focus on massive hydration—4 to 5 litres of water.
- Day 2: Test yourself on a moderate, less exposed summit like Mont Ernest-Laforce (820m). Carry your full winter pack to simulate the effort of a bigger day. Monitor for any warning signs.
- Day 3: With your body now better adapted, attempt your primary objective like Mont Jacques-Cartier, starting well before sunrise.
This “climb high, sleep low” approach (even on a micro-scale) gives your body the precious time it needs to produce more red blood cells and adapt to the thinner air. Rushing this process is a recipe for failure.
Why Is the “Gasp Reflex” the Real Killer in Cold Water Kayaking?
While you may not be planning a kayaking trip, you will inevitably face its winter equivalent: stream and river crossings. In the early or late season, or during a mid-winter thaw, what was a solid snow bridge in the morning can be a rushing torrent of near-freezing water by the afternoon. A fall into this water is one of the most acute dangers in the Chic-Chocs, not because of the depth, but because of the body’s instant, involuntary reaction to the cold: the cold shock response.
The moment that icy water hits your skin, you experience an uncontrollable “gasp reflex,” causing you to inhale sharply. If your head is underwater, you aspirate water, leading to drowning. Even if your head is above, the shock triggers hyperventilation, a massive spike in heart rate and blood pressure, and a near-instant loss of muscle control. You have about one minute of useful movement before your limbs become stiff and useless. This is why a simple slip can be fatal.
Your strategy for water crossings must be one of absolute caution and respect. The first step is avoidance: scout potential crossings on your ascent, noting the most secure-looking snow bridges or rock-hopping points for your return journey when you’ll be tired and visibility may be worse. Always test a snow bridge with your poles and full body weight before committing the group. When a crossing is unavoidable, unbuckle the waist and chest straps of your pack. This allows you to shed it quickly if you fall, preventing it from pulling you under. Some locals even carry a pair of lightweight chest waders or simply large garbage bags to pull over their boots for a quick, waterproof dash across a shallow stream. Most importantly, if you do get a boot full of water, you must practice the mental fortitude to control your breathing and prevent panic, a skill you can rehearse with controlled cold exposure at home.
10 lbs or 30 lbs: How Heavy Should Your Ruck Be to Avoid Back Injury?
The weight of your pack is a direct tax on your energy reserves. Every extra pound is one you must carry, warm, and fuel for the entire day. The question isn’t how much you *can* carry, but how little you *need* to carry while remaining safe. For a winter day-trip in the Chic-Chocs, a properly packed rucksack will weigh between 25 and 35 pounds (11-16 kg). Lighter than this, and you are likely missing critical safety gear. Heavier, and you are carrying luxuries that will only slow you down and increase your risk of fatigue-related injury.
The distribution of this weight is just as important as the total. The contents can be broken down into key categories:
- Avalanche Gear (15%): Your beacon, metal shovel, and probe are non-negotiable and form the dense, heavy base of your safety equipment.
- Extra Layers (20%): Your “puffy” insulation jacket, a hardshell for wind/wet, and spare gloves/hat. This is your survival insurance.
- Food & Water (40%): This is the heaviest component. 3 litres of water (in thermoses) and up to 5,000 calories of food is essential. This weight will decrease throughout the day.
- Emergency & Navigation (25%): This includes your first aid kit, an emergency bivy or shelter, a repair kit (for snowshoes, bindings, etc.), map, compass, and potentially crampons or ski crampons.
This is not a summer hiking pack. This is a winter life-support system. Training with this weight is essential.
Carrying a 30-pound pack is a skill. It requires a strong core, properly adjusted straps (most of the weight on your hips, not your shoulders), and physical conditioning. Your training hikes—whether up a local hill in Ireland or through a provincial park in Ontario—should be done with a fully loaded pack. This trains your muscles, shows you how the pack settles, and highlights any fit issues before they cause painful chafing or back strain on a remote mountainside. You must arrive at the trailhead accustomed to the burden, not shocked by it.
Key Takeaways
- Physiological preparation (metabolic, moisture, acclimatization) is more important than raw fitness for a successful Chic-Chocs ascent.
- Mastering your equipment—from layering systems to avalanche beacons—through relentless practice in non-critical environments is the key to performance under pressure.
- Discipline is your most important safety tool: respecting turn-around times and navigating cautiously are signs of an expert, not a novice.
How to Navigate Above the Treeline When Visibility Drops to Zero?
You’ve managed your energy, your layers, and your time perfectly. You are above the treeline, nearing the summit plateau. Then, the world disappears. The wind picks up, the clouds descend, and suddenly you can’t distinguish the snow at your feet from the sky in front of you. This is a whiteout. It is profoundly disorienting and deeply intimidating. In this moment, all your physical training becomes secondary to one critical skill: the ability to navigate in zero visibility. This is the final exam of your expedition.
In a whiteout, your GPS might fail due to cold or battery drain. Your visual landmarks are gone. You are left with the most fundamental tools: your magnetic compass, your altimeter, and your ability to read the terrain through your feet. Local Chic-Chocs guides are masters at this, using the subtle patterns carved in the snow by the wind (sastrugi) and the feel of the slope angle to maintain their bearing. This is an advanced skill, but the foundation it’s built on is universal: the unwavering ability to trust your compass and pace count.
This is not a skill you can learn on the spot. It must be drilled into you, which is why your training starts now, in your own backyard. For those in Ireland, the foggy, featureless terrain of a local bog is a perfect training ground. For those in Canada, a local forest or park will suffice. The drills are simple but crucial:
- Practice “boxing” around an obstacle (like a tree or a pond) in low visibility, using only 90-degree turns and precise pace counting to return to your original bearing.
- Walk a 100-pace straight line on a specific bearing in fog or with your eyes closed (with a partner), then check your accuracy.
- Practice reading the terrain through your feet: can you feel a subtle change in slope angle? Can you maintain a line parallel to a contour?
This practice builds the deep, unshakable confidence in your tools and techniques that you will need when your vision is gone and your instincts are screaming at you. It reduces the cognitive load, allowing you to make clear, life-saving decisions.
Your Chic-Chocs expedition begins now, not at the trailhead. Start integrating these physiological and technical drills into your training today to transform a challenging ascent into a successful and memorable summit.