The reason soda bread is gentler on your stomach isn’t just the absence of yeast; it’s the swift chemical reaction that bypasses the gas-producing fermentation common in commercial breads.
- Unlike yeast, which ferments for hours and produces bloating-related compounds (FODMAPs), baking soda creates a rapid, clean leavening.
- Authentic soda bread uses low-protein flour and minimal handling, which prevents the formation of a tough, hard-to-digest gluten network.
Recommendation: For the most digestible and authentic loaf, use a Canadian pastry flour (8-10% protein) and mix your dough for no more than 30 seconds before shaping.
The comforting aroma of freshly baked bread is universal, but for many, the pleasure is short-lived, followed by bloating and digestive discomfort. We often point the finger at gluten or search for complex sourdough starters, believing the solution must be equally complicated. We see commercial bread packed with additives and yeast, and assume that’s just the price to pay. This quest for a “better bread” often leads us down a rabbit hole of exotic flours and days-long fermentation processes, overlooking a simpler, time-honoured solution.
But what if the true secret to a delicious, digestible loaf isn’t about complex biological fermentation, but its very opposite? What if it lies in a simple, rapid chemical reaction that has been perfected in Irish kitchens for centuries? This is the core principle of traditional Irish soda bread. It’s a bread born from necessity, using just four basic ingredients, yet its genius lies in its chemistry. It elegantly sidesteps the entire yeast fermentation process, which is often the root cause of digestive issues for those with sensitivities.
This guide isn’t just another recipe. As a health-focused baker, I want to take you deeper into the “why.” We’ll explore the science behind its gut-friendly nature, from the leavening agent to the very flour you choose. We’ll master the techniques that create that perfect crust and tender crumb, and even look at how this Irish tradition can be adapted with beautiful local Canadian ingredients. Prepare to rediscover bread, not as a source of discomfort, but as the wholesome, satisfying food it’s meant to be.
To help you navigate this journey from science to slicing, this article breaks down every crucial element. You’ll find a clear path to understanding and mastering the art of digestible, delicious soda bread.
Summary: The Baker’s Complete Guide to Gut-Friendly Irish Soda Bread
- Baking Soda vs. Yeast: How Does the Leavening Agent Affect Gut Health?
- How to Get the Perfect Crunchy Crust on Soda Bread in a Modern Oven?
- Whole Wheat vs. White Flour: Which Mix Creates the Authentic Texture?
- The Over-Kneading Error That Turns Soda Bread into a Brick
- Fresh vs. Day-Old: When Is the Optimal Moment to Serve Soda Bread?
- Why Does Slow-Cooking Stew for 6 Hours Change the Nutritional Profile?
- Sauerkraut vs. Kimchi: Which Fermented Food Is Easier to Make at Home?
- How to Adapt Traditional Irish Stew Using Local Canadian Ingredients?
Baking Soda vs. Yeast: How Does the Leavening Agent Affect Gut Health?
The belief in soda bread’s digestive benefits isn’t a modern health trend. It’s a piece of wisdom baked into its history. As one observer noted in 1836, it was a bread celebrated for its wholesome qualities:
There is no bread to be had equal to it for invigorating the body, promoting digestion, strengthening the stomach, and improving the state of the bowels.
– Newry Telegraph correspondent, The Farmer’s Magazine, November 1836
The magic lies in the fundamental difference between leavening agents. Commercial bread relies on yeast, a living microorganism that feeds on sugars in the flour. This is a slow biological fermentation process. As the yeast works, it produces carbon dioxide bubbles that make the bread rise, but it also creates other compounds. For people with sensitivities, particularly Irritable Bowel Syndrome (IBS), this fermentation can produce an excess of FODMAPs (Fermentable Oligosaccharides, Disaccharides, Monosaccharides, and Polyols), which are notorious for causing gas, bloating, and discomfort.
Soda bread, in contrast, uses a simple and rapid chemical reaction. The baking soda (an alkali) reacts instantly with the acid in the buttermilk. This acid-base reaction produces carbon dioxide gas immediately, creating lift without any fermentation. By skipping fermentation, you skip the primary source of gut-irritating FODMAPs. This is supported by research into different bread types, where studies on IBS patients comparing fermented breads found that longer yeast fermentations can increase digestive distress. One study showed that breads with different fermentation profiles had a clear impact, where a specific type of fermented dough was proven to produce significantly lower cumulative gas in IBS subjects compared to standard baker’s yeast bread. Soda bread takes this a step further by eliminating the biological fermentation process entirely.
Ultimately, by choosing baking soda over yeast, you are not just choosing a faster method; you are choosing a fundamentally different and gentler chemical pathway to a risen loaf.
How to Get the Perfect Crunchy Crust on Soda Bread in a Modern Oven?
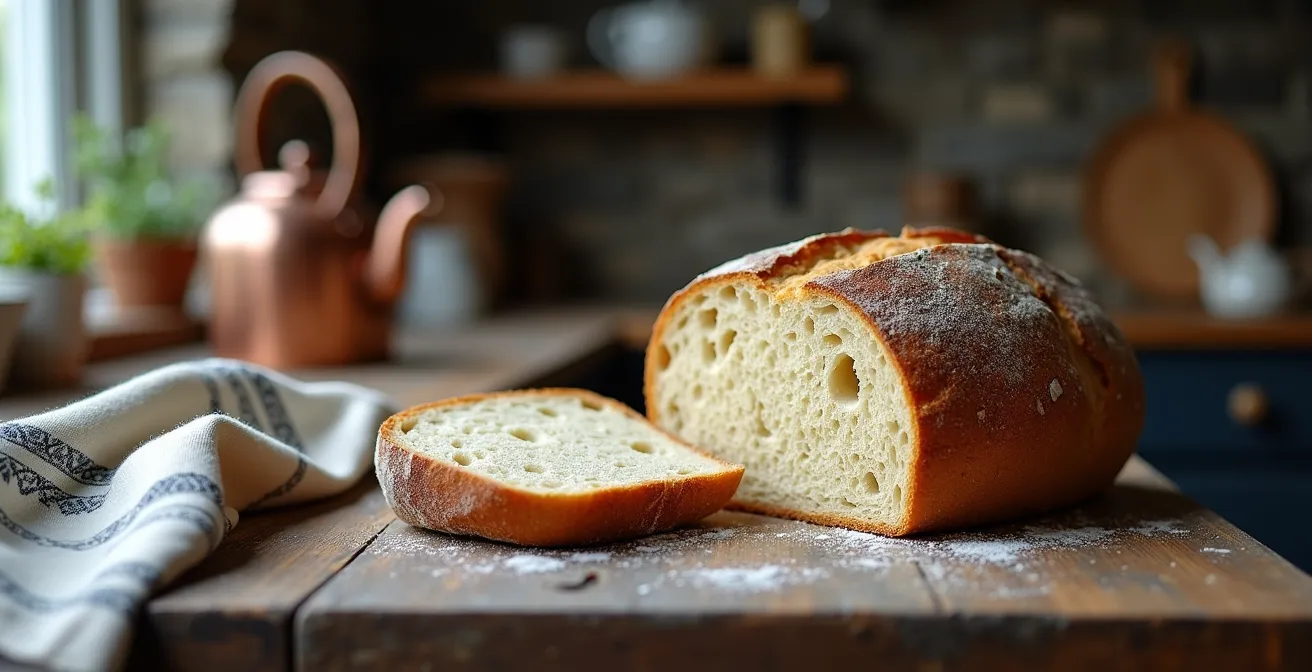
The soul of a great soda bread is the contrast between its tender, soft crumb and its substantial, crunchy crust. Achieving this at home doesn’t require a professional baker’s oven, but an understanding of heat. The secret is to create an environment of intense, consistent, and radiant heat. The single best tool for this in a modern kitchen is a pre-heated cast iron Dutch oven. Unlike a thin baking sheet, which heats and cools quickly, a heavy cast iron pot absorbs and radiates heat evenly, cooking the loaf from all sides and ensuring a deeply browned, crisp base and crust.
The visual result of this method is undeniable. The high, dry heat of the cast iron creates a perfect environment for the Maillard reaction, developing the complex flavours and deep golden-brown colour that define an artisanal crust.
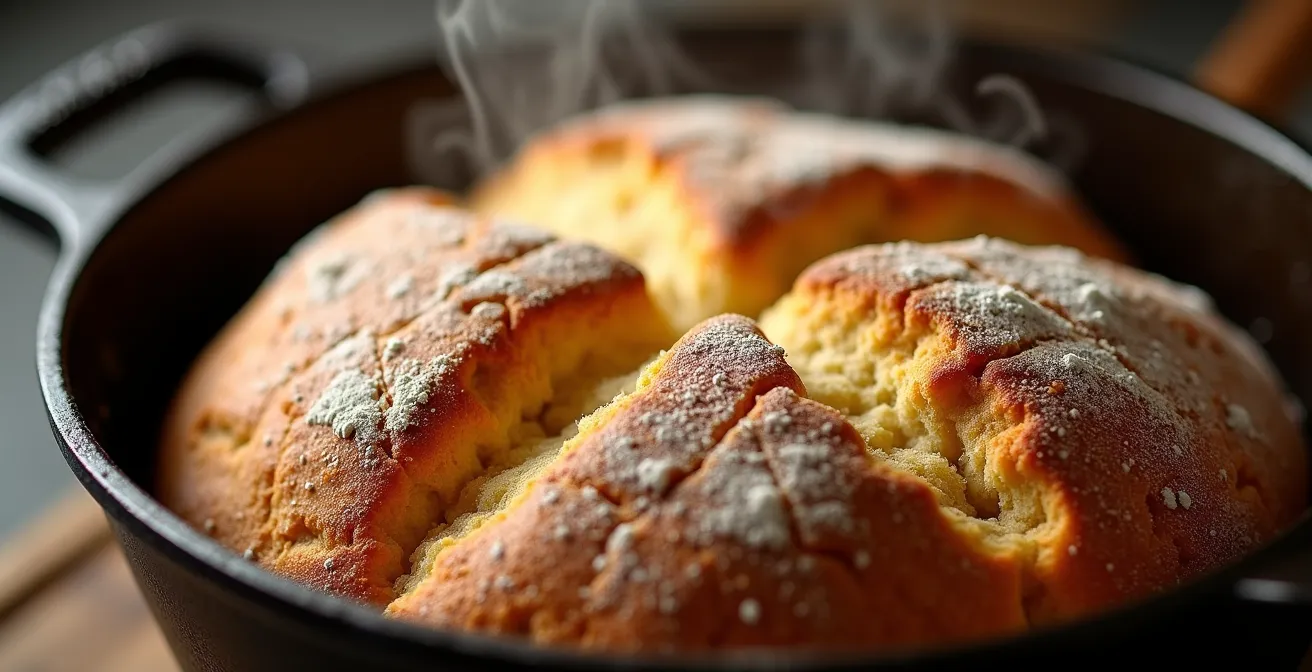
As you can see, the direct contact with the searingly hot metal produces a superior crust that’s impossible to replicate on a standard baking tray. This technique mimics the conditions of old hearth ovens, using modern tools to achieve a timeless result. Follow these simple steps for a perfect crust every time.
- Step 1: Preheat your cast iron Dutch oven in a 450°F (230°C) oven for at least 15 minutes. It needs to be screaming hot.
- Step 2: Carefully rub a little oil over the interior of the pot. This prevents the dough from sticking and protects any enamel from thermal shock.
- Step 3: Gently place your shaped loaf into the hot, oiled Dutch oven (without the lid) and bake for about 35 minutes, or until deeply golden and hollow-sounding when tapped.
- Step 4: Trust the cast iron. It will give you a far better, crispier crust on the base of the loaf compared to baking on a sheet.
By mastering the use of a Dutch oven, you are not just baking bread; you are controlling heat to forge the perfect texture that makes soda bread so satisfying.
Whole Wheat vs. White Flour: Which Mix Creates the Authentic Texture?
The authentic, tender texture of Irish soda bread is directly linked to the type of flour used. The key is not the colour (whole wheat vs. white) but the protein content. Traditional Irish flour is milled from soft wheat, resulting in a low protein content of around 8-9%. Low protein means less gluten-forming potential. Since soda bread is not kneaded, you don’t want to develop a strong, chewy gluten network like you would in a sourdough or baguette. The goal is tenderness, a texture almost like a scone or a cake.
For those of us baking in Canada, finding true Irish flour can be difficult. However, we have an excellent local substitute: Canadian pastry flour. With a protein content of 8-10%, it is the perfect stand-in to replicate that authentic soft crumb. Using high-protein Canadian bread flour (12-14%) is a common mistake that will result in a tough, chewy loaf. All-purpose flour is acceptable but can be slightly denser. If you want to incorporate whole wheat for flavour and fibre, it should be a coarse variety and used sparingly, making up no more than 30% of the total flour to avoid a dense, heavy texture.
This table, based on data from an extensive flour comparison, breaks down the best choices for achieving that authentic texture.
| Flour Type | Protein Content | Best Use | Result |
|---|---|---|---|
| Irish Soft Wheat (e.g., Odlums) | 8-9% | Traditional authentic | Soft, cake-like crumb |
| Canadian Pastry Flour | 8-10% | Best substitute | Tender, authentic texture |
| All-Purpose Flour | 10-12% | Acceptable substitute | Slightly denser |
| Canadian Bread Flour | 12-14% | Avoid | Tough, chewy texture |
| Coarse Wholemeal | 11-13% | 30% mix maximum | Adds flavor, density |
By consciously selecting a low-protein flour, you are working with the bread’s chemistry, not against it, ensuring a final product that is not only delicious but also easier on the digestive system.
The Over-Kneading Error That Turns Soda Bread into a Brick
Even the most experienced bakers can make a mistake that turns a potential masterpiece into a dense, inedible “brick.” One baker shared their humbling experience after a failed sourdough attempt, a lesson that applies perfectly to soda bread: “the only way to learn is to eat your own baking however it turns out.” This is especially true when it comes to the most common error in making soda bread: over-mixing or kneading.
When I baked my last sourdough brick I lined my skillet with baking paper and after baking it the paper became part of the bread crust… I lost all that crust because I think the only way to learn is to eat your own baking however it turns out.
– Baker’s Experience, The Irishman’s Wife
The science is simple and unforgiving. The leavening power of soda bread comes from the instantaneous chemical reaction between the baking soda and buttermilk. This reaction starts the moment the wet ingredients hit the dry. All the gas that will ever be produced is created in those first few seconds. If you continue to mix or knead the dough, you are literally knocking those precious air bubbles out. At the same time, you are developing the gluten in the flour, creating a tough, chewy structure. The combination is disastrous: a dense texture with no lift.
The correct approach is counter-intuitive for most bakers. You must embrace a “shaggy, sticky mess” and handle the dough as little as humanly possible. The goal is to just barely bring the ingredients together, shape it quickly, and get it into the oven. This minimal handling preserves the gas bubbles and keeps the gluten structure weak and tender, which is key to its easy digestibility.
Your Action Plan: The 30-Second Mixing Rule
- Combine dry ingredients: First, whisk your low-protein flour, salt, and baking soda together thoroughly to ensure the leavening is evenly distributed.
- Cut in the butter: Add cold butter pieces and rub them into the flour with your fingertips until the mixture resembles coarse meal.
- Pour and mix fast: Create a well in the center and pour in all the buttermilk at once. Using a fork or your hands, mix for no more than 30 seconds until a shaggy, sticky dough forms.
- Shape with minimal handling: Turn the dough onto a well-floured surface and gently fold it over on itself a few times (maximum 8 folds) to form a round. Do not knead!
- Score and bake immediately: Remember, the chemical activation between buttermilk and baking soda starts instantly. The sooner it’s in the hot oven, the better the rise.
By respecting the speed of the chemical reaction and resisting the urge to knead, you ensure a light, tender crumb every single time.
Fresh vs. Day-Old: When Is the Optimal Moment to Serve Soda Bread?
Unlike yeasted breads that can develop more complex flavours over a day or two, soda bread is a creature of the moment. Its peak perfection is fleeting, and understanding its life cycle is key to enjoying it properly. The optimal moment to serve and eat soda bread is on the very day it is baked, ideally while it is still warm from the oven. This is when the textural contrast is at its most dramatic: the crust is shatteringly crisp, and the crumb is soft, moist, and steaming.
As one baker wisely notes, it is best eaten on the day it’s baked, capturing that perfect moment of freshness. After a few hours, the moisture from the crumb begins to migrate into the crust, softening it. While still delicious, that magical crunch is lost. However, this doesn’t mean the bread is finished. Day-old soda bread enters a new, equally wonderful phase of its life: it becomes the ideal candidate for toasting.
A thick slice of day-old soda bread, toasted and slathered with good butter (perhaps some local Canadian butter!), is one of life’s simple pleasures. The toasting process drives out the excess moisture and resurrects the crust’s crispiness, while the dense crumb becomes golden and fragrant. Don’t ever throw away stale soda bread; its journey is just beginning. Here is a simple guide to enjoying your loaf from the first hour to the last crumb.
- Day 1 (0-2 hours): The golden window. Serve warm from the oven with plenty of butter to let it melt into the tender crumb. The crust will be at its absolute crispiest.
- Day 1 (2-8 hours): Perfect for accompanying meals. Use it to sop up the last of a hearty stew or serve alongside a soup. The crumb is still soft and the crust has a pleasant chew.
- Day 2: Breakfast perfection. Cut thick slices and toast them in a pan with butter until golden brown and delicious. This is arguably the best toast you will ever have.
- Day 3 and beyond: If any remains, store it in an airtight container for up to 3-4 days. It can still be toasted or revived in the oven.
- End of life: Turn any truly stale pieces into fantastic breadcrumbs. Pulse in a food processor and use them as a crunchy topping for casseroles or pasta.
By appreciating each stage of its life, from warm and fresh to golden and toasted, you honour the bread and waste nothing.
Why Does Slow-Cooking Stew for 6 Hours Change the Nutritional Profile?
It might seem like a leap from soda bread to a slow-cooked stew, but the underlying principle is a powerful analogy for understanding food transformation. Just as slow-cooking a tough cut of meat for hours breaks down tough collagen into luscious, digestible gelatin, the process a flour undergoes profoundly changes its final “nutritional profile” and digestibility. The method of transformation is everything.
A slow-cooked stew takes an ingredient that is initially tough and hard to digest (like a beef chuck or lamb shoulder) and, through low and slow heat, makes its nutrients more bioavailable. The same logic applies to bread, but with a crucial twist. With a yeast bread, the long, slow biological fermentation also breaks down the flour. However, as we’ve seen, this process can create by-products like FODMAPs that are problematic for sensitive guts. It’s a form of transformation that can introduce irritants.
Soda bread’s rapid chemical leavening is the opposite. It’s like flash-cooking instead of slow-cooking. The flour is not being “pre-digested” or altered by microorganisms over many hours. Its structure remains largely intact, and the process avoids the creation of those fermentable compounds. This is why, for many, it’s a wholesome food that aids digestion and provides energy without the bloating. The transformation is minimal and clean, preserving the integrity of the ingredients in a way that a long, slow fermentation does not.
Thinking of soda bread’s leavening as a “quick cook” method for flour helps to cement why it’s a fundamentally different and often gentler food than its slow-fermented cousins.
Sauerkraut vs. Kimchi: Which Fermented Food Is Easier to Make at Home?
The world of fermented foods is a fascinating one, from sourdough starters to kombucha, kimchi, and sauerkraut. These foods are celebrated for their probiotic benefits, but they represent a journey into the complex and sometimes unpredictable world of managing live cultures. Comparing the process of making sauerkraut versus kimchi is a perfect illustration of this complexity, and it shines a bright light on why soda bread is such a beautifully simple alternative.
Making sauerkraut is relatively straightforward, requiring just two ingredients: cabbage and salt. The process is long but largely hands-off. Kimchi, on the other hand, is a much more involved affair, often requiring a dozen or more ingredients, including specific chili powders and fermented fish sauces that can be hard to find in many parts of Canada. The fermentation is faster but carries a higher risk of failure for a beginner.
This table highlights the stark difference in complexity, a difference that mirrors the gap between yeast-leavened breads and soda bread.
| Factor | Sauerkraut | Kimchi | Winner for Beginners |
|---|---|---|---|
| Ingredients Needed | 2 (cabbage, salt) | 10+ (including gochugaru, fish sauce) | Sauerkraut |
| Availability in Ireland/Canada | Universal | Limited to urban centers | Sauerkraut |
| Fermentation Time | 3-4 weeks | 3-7 days | Kimchi |
| Risk of Failure | Low | Medium-High | Sauerkraut |
| Cost | Very Low | Medium-High | Sauerkraut |
Yeast and sourdough breads belong in this world of fermentation. They require feeding starters, managing temperatures, and understanding the nuances of live cultures. Soda bread, however, stands completely apart. It is not fermentation; it is pure chemistry. It’s as simple and reliable as baking a cake. You mix, you shape, you bake. There is no culture to kill, no starter to feed, and no week-long wait. This makes it the perfect entry point for anyone wanting to bake healthy bread at home without the steep learning curve of fermented doughs.
For those seeking a reliable, quick, and gut-friendly bread, soda bread offers an escape from the complexities of fermentation, delivering delicious results every time.
Key takeaways
- The key to soda bread’s digestibility is its rapid chemical leavening, which avoids the gas-producing biological fermentation of yeast.
- For an authentic, tender crumb, always use a low-protein flour (like Canadian pastry flour) and handle the dough for less than 30 seconds.
- Achieving a perfect, crunchy crust is best done by baking the loaf in a pre-heated cast iron Dutch oven to ensure intense, even heat.
How to Adapt Traditional Irish Stew Using Local Canadian Ingredients?
While this article is about the bread, not the stew, no discussion of Irish soda bread is complete without acknowledging its perfect partner. The question of adapting a traditional Irish stew with local Canadian ingredients is a beautiful metaphor for how we can take a cherished tradition and make it our own. The same principle applies to the bread itself. We can honour the traditional recipe while thoughtfully incorporating high-quality local Canadian ingredients to create something that is both authentic in spirit and rooted in our own landscape.
The essence of the traditional recipe—a simple, rustic loaf leavened with soda—should remain untouched. But the details can be beautifully localized. Instead of a generic whole wheat, you could add a small portion of Canadian-grown Red Fife wheat flour for its nutty, complex flavour. The buttermilk, which provides the crucial acid for the leavening, could be sourced from a local Ontario or Quebec dairy, whose products will have a unique terroir.
For a truly Canadian twist, consider adding a tablespoon of finely ground flax seeds or a handful of toasted sunflower seeds, both staples of the Prairies. A very subtle hint of sweetness can be introduced not with sugar, but with a teaspoon of maple flakes from a Quebec sugar bush, adding a whisper of local flavour without compromising the bread’s savoury character. The goal is not to reinvent the bread, but to infuse it with a sense of place, using the best of what Canada has to offer.
Your journey to delicious, gut-friendly bread starts now. Grab your apron, choose a quality Canadian pastry flour, and experience the simple magic of traditional Irish soda bread for yourself.
Frequently Asked Questions About The Best Flour for Irish Soda Bread
Can I use 100% whole wheat flour?
No, using 100% whole wheat flour will make the soda bread far too dense and heavy. For the best results, use a maximum of 30% whole wheat flour mixed with 70% of a low-protein white flour, such as pastry flour. This will give you the flavour of whole wheat without sacrificing the tender crumb.
Why does Canadian bread flour make tough soda bread?
Canadian bread flour has a high protein content, typically between 12-14%. When this flour is mixed with liquid, it develops a strong and elastic gluten network. This is desirable for chewy breads like bagels or baguettes, but it’s the opposite of what’s needed for soda bread. This strong gluten results in a tough, chewy loaf instead of the traditional soft, tender texture.
What’s the difference between Irish wholemeal and North American whole wheat?
The difference is primarily in the texture of the grind. Traditional Irish wholemeal flour is coarse and stone-ground, which gives soda bread a distinctive texture and bite. Most North American whole wheat flour is much more finely milled. While you can use it, seeking out a coarser, stone-ground variety will get you closer to the authentic Irish result.